Table of Contents:
- What is a Workflow Template?
- Why Workflow Templates are Important
- Important Elements of a Workflow Template
- How to Use Workflow Templates
- Software Development Workflow Template
- Expense Tracking Workflow Template
- Decision-Making Workflow Template
- Project Management Workflow Template
- Human Resources Onboarding Workflow Template
- Marketing Campaign Workflow Template
- Retail Inventory Management Workflow Template
- Manufacturing Production Workflow Template
What is a Workflow Template?
A workflow template is a visual representation of a series of tasks, from start to finish, carried out by a team or an individual.
The template typically employs symbols, shapes, and arrows to illustrate the flow of work and highlight relationships between tasks, allowing for a clear understanding of roles and responsibilities.
Workflow templates not only serve as digital guidelines but also function as intuitive roadmaps leading the implementation of a wide range of business processes.
Common examples include marketing campaigns, product development processes, customer service operations, and project management.
Why Workflow Templates are Important
- Boosts Efficiency - Workflow templates help avoid confusion by clearly delineating the sequence of actions and the overall process. Consequently, companies maximize time utilization and minimize wasted resources.
- Enhances Collaboration - By offering a common reference point, team members can better communicate and collaborate, ensuring that misunderstandings or redundancy are kept at bay.
- Provides Consistency and Predictability - Using workflow templates standardizes your processes, making it easier to predict performance, accurately allocate resources, and detect potential bottlenecks or issues.
- Optimizes Decision Making - A well-designed workflow template enables you to make informed decisions based on transparent and organized data, effectively eliminating guesswork.
- Fosters Continuous Improvement - Workflow templates facilitate identifying areas where improvements can be made, contributing to the ongoing refinement of your business processes.
Important Elements of a Workflow Template
An effective workflow template consists of several key elements that ensure flexibility and efficiency. These components include:
- Tasks - The individual steps a workflow contains, typically represented as boxes or shapes.
- Sequences - The order in which tasks are carried out, indicated by arrows or lines connecting the tasks.
- Roles - Roles or departments responsible for specific tasks, denoted by labels or color-coding.
- Decision-Making Points - Points where the workflow diverges, often shown as diamond-shaped symbols, which signify the need for a decision to determine the path to be followed.
- Start and End Points - Indicated by unique symbols, these points signify the beginning and conclusion of the workflow.
How to Use Workflow Templates
Now that we've explored the importance of workflow templates and their essential elements let's dive into the process of creating and using one:
- Understand Your Process - Begin by analyzing the process you want to streamline or improve. Break it down into individual tasks, and identify the responsible departments or team members.
- Choose a Workflow Tool or Method - Pick a tool or method that suits your team's needs and resources. Common choices include online workflow tools, Microsoft Office applications, or even hand-drawn diagrams.
- Create the Workflow Template - Use your chosen tool to create a visual representation of your process. Ensure that it incorporates tasks, sequences, roles, decision-making points, and start and end markers.
- Review and Refine - Gather feedback from team members, managers, and stakeholders. Use their input to make the necessary adjustments to your workflow template, optimizing the process.
- Implement the Workflow Template - Share the final workflow template with your team, provide training if necessary, and launch your newly streamlined process.
- Monitor and Continuously Improve - Regularly review your workflow template and look for possibilities to increase efficiency, foster collaboration, and reduce redundancies.
Ready to create Workflow Template? Read Workflow Complete Guide first for better understanding of Workflow!
Now, let's explore 8 examples of workflow templates in various industries:
Software Development Workflow Template
A software development workflow furnishes a systematic structure to organize and manage the tasks needed to deliver a software product.
By defining the roles, responsibilities, sequences, and deliverables at each stage, the workflow ensures a streamlined process from development to deployment.
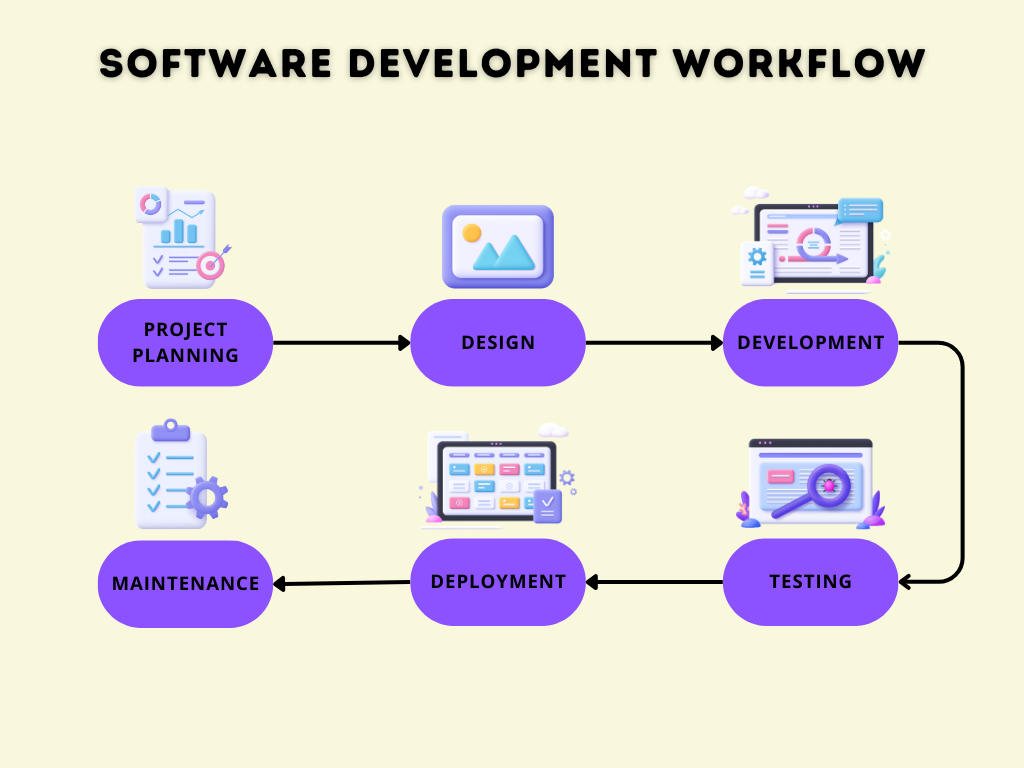
Project Planning
This phase involves identifying project requirements, preparing an outline and establishing timelines.
- Gather software requirements.
- Define project scope and deliverables.
- Prepare a project schedule with deadlines.
Design
The Design phase outlines the software's architecture and the user interface.
- Create system and software design documents.
- Review and approve designs.
Development
During this phase, developers write the actual code for the software.
- Assign coding tasks to developers.
- Stage regular code reviews for quality assurance.
- Merge code to the main branch for testing.
Testing
This phase is crucial to catch any bugs or issues that could impact software functionality.
- Conduct various tests, including integration, system, and user acceptance tests.
- Document any identified issues or bugs.
- Assign bug fixes to developers.
Deployment
After successful testing and approval, the software is deployed to the production environment.
- Prepare deployment plan and schedule.
- Deploy software to production environment.
- Monitor software for any immediate issues.
Maintenance
This phase includes regular updates and modifications based on user feedback.
- Collect and review user feedback.
- Plan and deploy regular software updates.
- Monitor software performance regularly.
Deploying a well-defined software development workflow allows for better planning, execution, and team communication, ultimately enhancing the capability to turn your vision into a tangible, functioning product with efficiency and precision.
Use this template as your baseline and customize it to suit the uniqueness of your software development process.
Expense Tracking Workflow Template
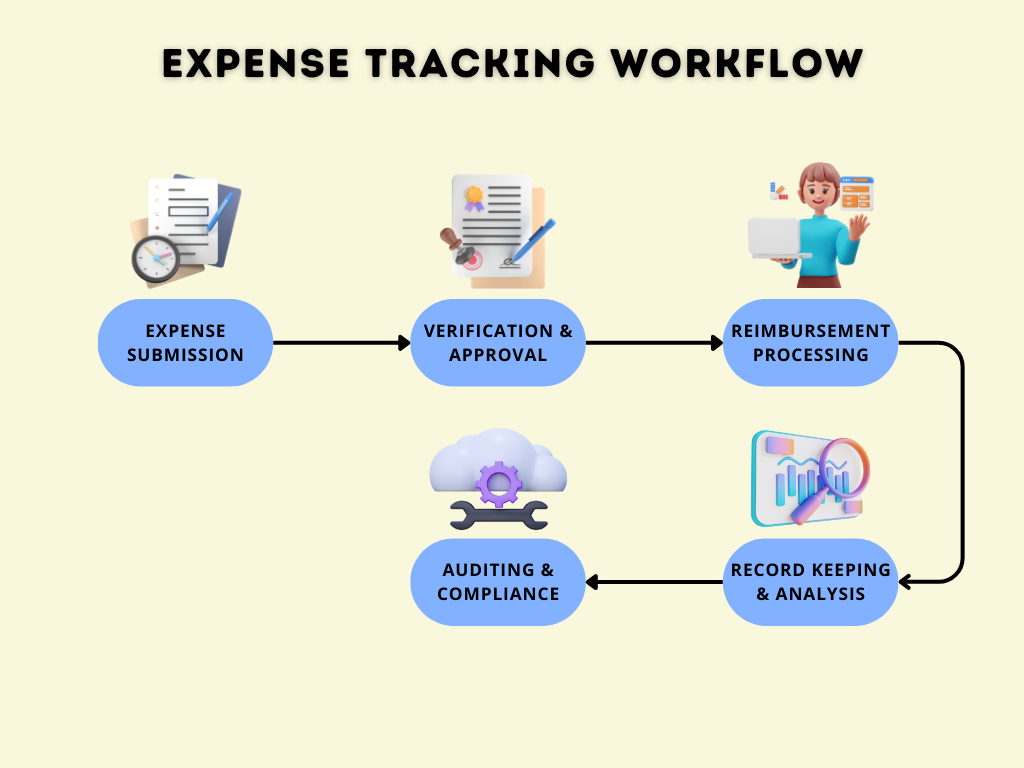
Expense Submission
This is the primary stage where employees submit their incurred business expenses to be reimbursed.
- Gather all receipts, invoices, and proofs of expenses.
- Complete the expense report, detailing each expenditure.
- Attach relevant receipts to the expense report.
- Submit the report to the supervisor or relevant department.
Verification and Approval
Once the expense reports are submitted, they must be validated and approved.
- Review the expense report for completeness and accuracy.
- Verify receipts and other proofs of expenses.
- Check expenses against company policies and budget limits.
- Approve or reject the expense report. If rejected, provide a clear reason and return it for rectification.
Reimbursement Processing
This stage involves the actual refunding of approved expenses to employees.
- Forward approved expense reports to the finance department.
- Calculate total reimbursement amounts.
- Process reimbursements through the appropriate payment channels.
- Confirm successful payment to the employee.
Record Keeping and Analysis
Record maintenance and analysis provide crucial data for budgeting and financial planning.
- Record reimbursed expenses in the accounting system.
- Categorize expenses and analyze spending trends.
- Update the budget based on actual expenses.
- Generate regular expenditure reports for management insights.
Auditing and Compliance
Regular audits ensure that the expense tracking process is transparent, fair, and in compliance with the relevant regulations.
- Schedule periodic audits of expense reports and reimbursement transactions.
- Verify accuracy of financial records.
- Ensure compliance with company policies, tax laws, and other relevant regulations.
- Recommend improvements to the expense tracking process based on audit findings.
This comprehensive expense tracking workflow can significantly streamline your business's financial operations, minimize errors, and enhance transparency.
Moreover, by facilitating proper record-keeping and analysis, it provides valuable insights for strategic financial decisions.
As you adopt and customize this template, remember the key to a successful workflow lies in its adaptability to your specific business needs and standing regulatory guidelines.
Decision-Making Workflow Template
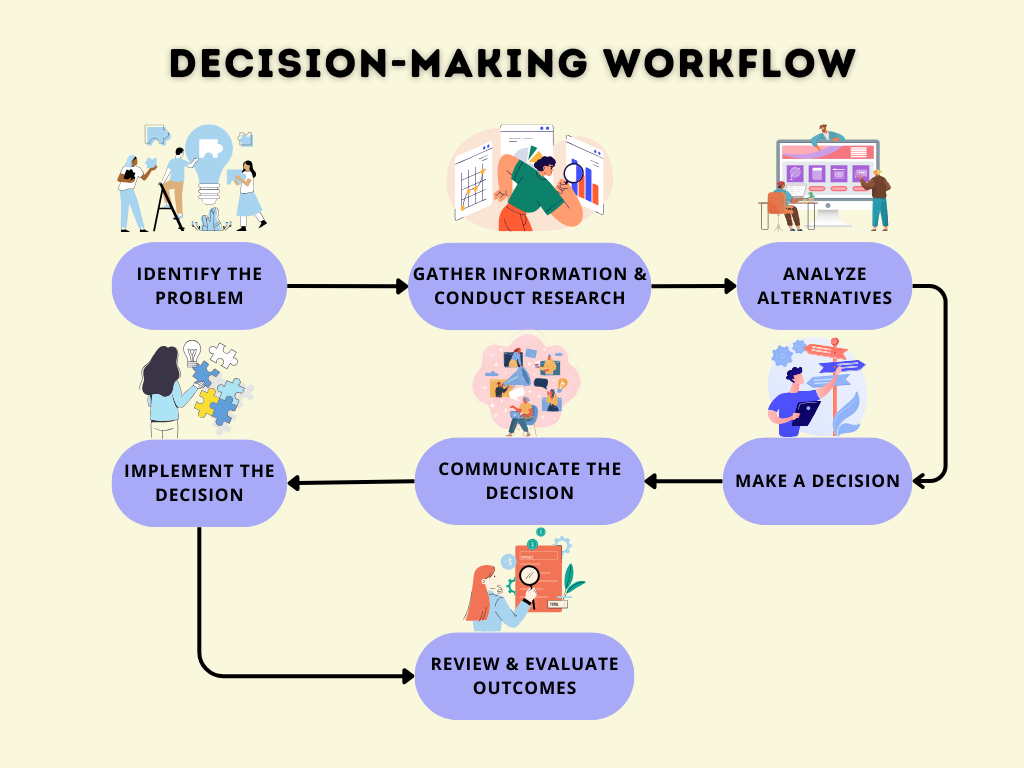
Identify the Problem
The first step in decision-making is to recognize and understand the problem or issue to be addressed.
- Determine the issue or opportunity that requires a decision.
- Clarify the scope and impact of the problem.
- Confirm the urgency and importance of the decision.
Gather Information and Conduct Research
This phase involves collecting relevant data and researching potential solutions.
- Identify information and resources needed to make an informed decision.
- Collect data from both internal and external sources.
- Evaluate the reliability of the information.
- Consult with subject matter experts if necessary.
Analyze Alternatives
Here, the decision-maker evaluates and compares possible solutions to the problem.
- Identify potential solutions based on the collected data.
- Analyze the pros and cons of each alternative.
- Assess the feasibility, viability, and risks associated with each option.
- Rank alternatives based on their merits and alignment with overall objectives.
Make a Decision
After thoroughly evaluating the alternatives, the decision-maker selects the best course of action.
- Choose the most suitable solution based on the analyzed information.
- Document the rationale behind the decision.
- Consult with stakeholders or team members if necessary.
- Obtain approval from relevant decision-making authorities.
Communicate the Decision
Clear communication ensures that all parties involved understand the decision and follow through accordingly.
- Inform stakeholders and team members about the chosen solution.
- Share the reasons behind the decision.
- Outline expectations and responsibilities for implementation.
- Address any concerns or questions raised by the stakeholders.
Implement the Decision
This stage encompasses the execution of the chosen solution and monitoring its progress.
- Develop an action plan for implementing the decision.
- Allocate resources and assign responsibilities to the team members.
- Execute the plan and monitor the progress.
- Identify any issues or roadblocks and address them as they arise.
Review and Evaluate Outcomes
Evaluating the outcomes of the implemented decision provides feedback for future decision-making.
- Measure the results against the initially defined problem and objectives.
- Assess the overall success of the implemented solution.
- Identify lessons learned and potential improvements for future decision-making.
- Make necessary adjustments or alterations to the chosen solution if required.
This comprehensive decision-making workflow template can be instrumental in enhancing the speed, quality, and consistency of choices made across your organization.
By streamlining the process and providing a methodical framework, this workflow empowers you to make well-informed and effective decisions to drive your business's success.
Project Management Workflow Template
Managing a project from inception to completion can be a daunting task without a detailed project management process.
Here's an outline for a workflow template designed to navigate the project management process effectively:
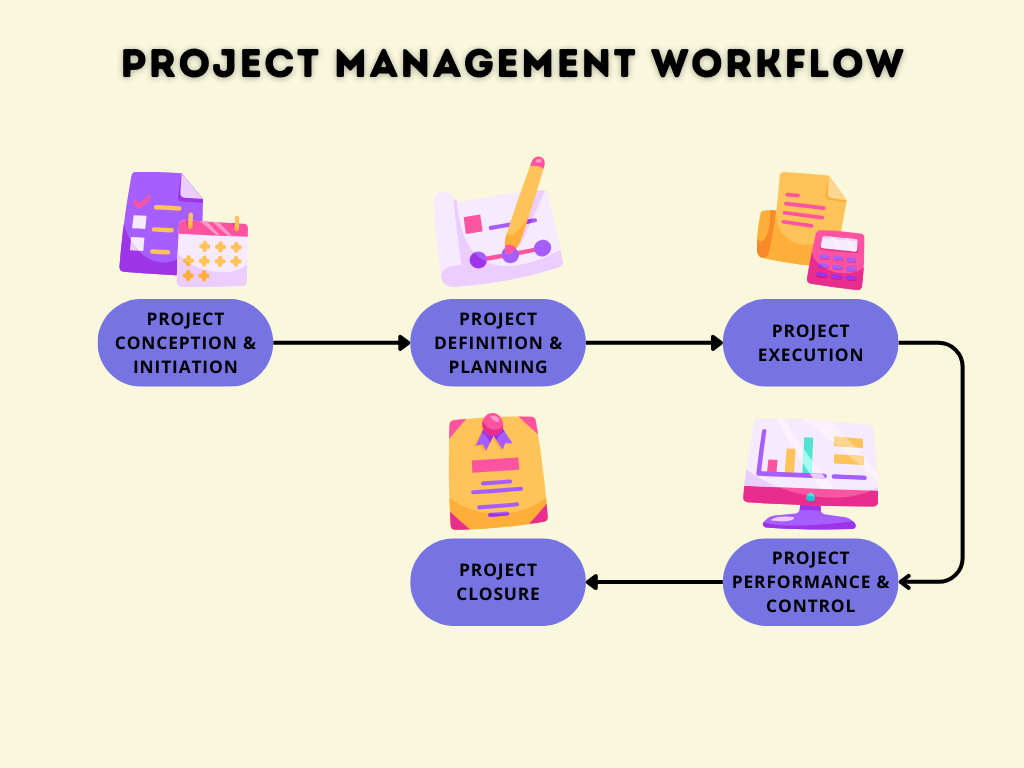
Project Conception and Initiation
- Develop Project Idea: Brainstorm possible project ideas based on business needs or requirements.
- Perform Feasibility Study: Evaluate the practicality of the project, considering factors like financial viability, time constraints, and resource availability.
Project Definition and Planning
- Define Project Goals: Clearly identify what the project is expected to achieve.
- Develop Project Plan: Map out a detailed plan, including project tasks, timelines, resources required, and budget.
- Identify Project Stakeholders: Define who will be involved in the project, their roles, and responsibilities.
Project Launch or Execution
- Assemble Project Team: Form a project team based on the roles and skill sets outlined in the project plan.
- Execute Project Tasks: Initiate the tasks as laid out in the project plan. Ensure that everyone knows their responsibilities.
- Manage Resources: Efficiently utilize and manage resources (human, material, and financial) to ensure that the project stays on track.
Project Performance and Control
- Monitor Progress: Closely supervise project progress compared to the project plan.
- Quality Control Checks: Conduct periodic quality checks to ensure output meets expected standards.
- Adjust Project Plan: Revise and adjust project plans as necessary, depending on project progress and any unexpected challenges.
Project Closure
- Evaluate Project Performance: Analyze the overall project performance aligned to goals, timelines, and budget.
- Project Deliverables: Confirm that all project deliverables have been completed and accepted by the client or stakeholder.
- Project Review: Conduct a project review to identify lessons learned and best practices for future projects.
- Celebrate Success: Recognize team efforts and celebrate project success.
Remember, processes may differ slightly based on the nature, scale, and complexity of a project, requiring you to tailor this template according to your specific project needs.
Human Resources Onboarding Workflow Template
Creating a thorough, engaging, and efficient workflow for your employee onboarding process is vital in welcoming and retaining new employees.
Here's a step-by-step guide to establishing an effective onboarding workflow within your human resources team:
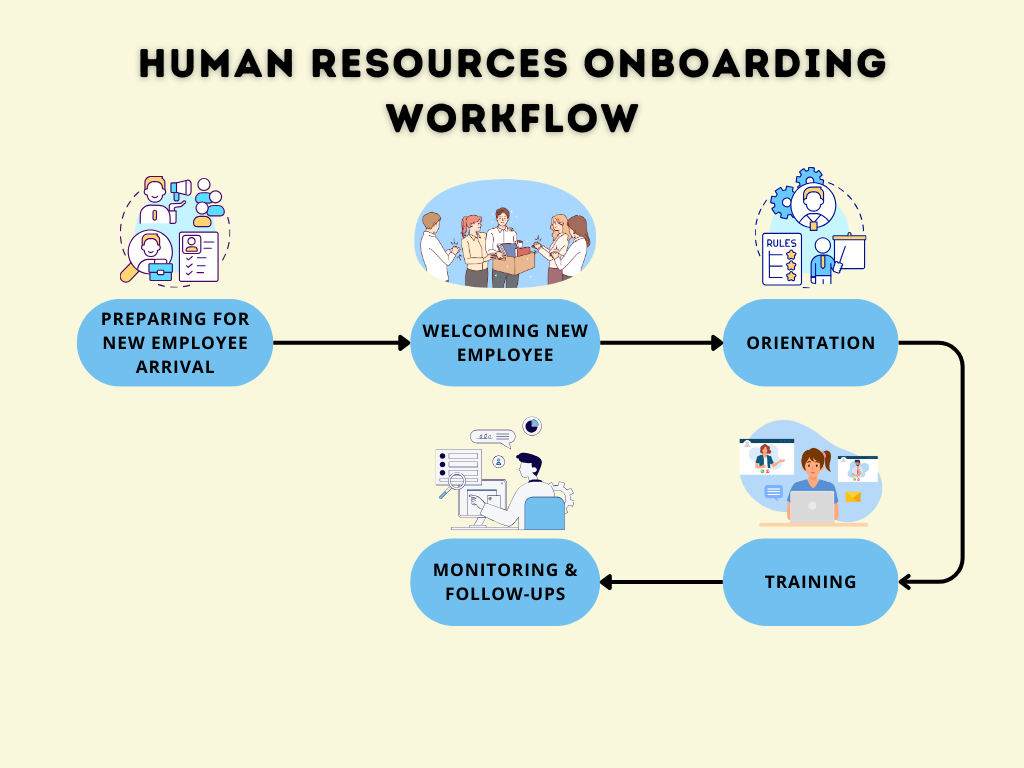
Preparing for New Employee Arrival
Prepare New Hire Paperwork
- Complete employment contract
- Assemble essential documents such as tax forms, benefit enrollment forms, and policy acknowledgment forms
Plan Onboarding Schedule
- Design a structured schedule for the first few days, weeks, or even months, to gradually introduce the new hire to their role and the organization
Set Up Necessary Tools
- Allocate computer, desk space, and any other necessary equipment
- Set up company email account, software access, and any other IT requirements
- Create login credentials for internal systems
Communicate New Hire Information
- Announce the new hire to the team and provide them information about the new employee
Welcoming the New Employee
Company Introduction
- Tour the organization and introduce the new employee to their team and other key members of the staff
- Provide a welcome kit that includes company merchandise (if available) and a copy of the company handbook
Initial Meetings
- Arrange meetings with immediate supervisor, team members, cross-functional collaborators, and top management
Orientation
Company Orientation
- Explain the company's mission, vision, values, and culture
- Review company policies, rules, and regulations
Job-Specific Orientation
- Introduce the new employee to their own position's duties, responsibilities, and KPIs
- Conduct first task or assignment briefing
Training
Office Software & Systems Training
- Provide training on company’s preferred communication tools, file management systems, project management software, etc.
Role-Specific Training
- Provide training on tools, software, or equipment they will be using specific to their role
- Go over job-specific procedures or workflows
Monitoring and Follow-ups
First Week Check-In
- Monitor the new hire's comfort and understanding of their role
- Address any concerns or issues that may have arisen
First Month Review
- Conduct a more comprehensive review of the new hire's performance to date
- Ask for feedback about the onboarding process and make potential adjustments for future hires
Remember, a successful onboarding process can increase employee retention and productivity.
It's about more than just the first day or week; it's about supporting new hires as they transition into their roles and become effective team members.
Marketing Campaign Workflow Template
Implementing a well-defined marketing campaign can make the difference between receiving a return on your marketing investment or wasting marketing dollars.
Here is a comprehensive workflow template for planning and managing your marketing campaign:
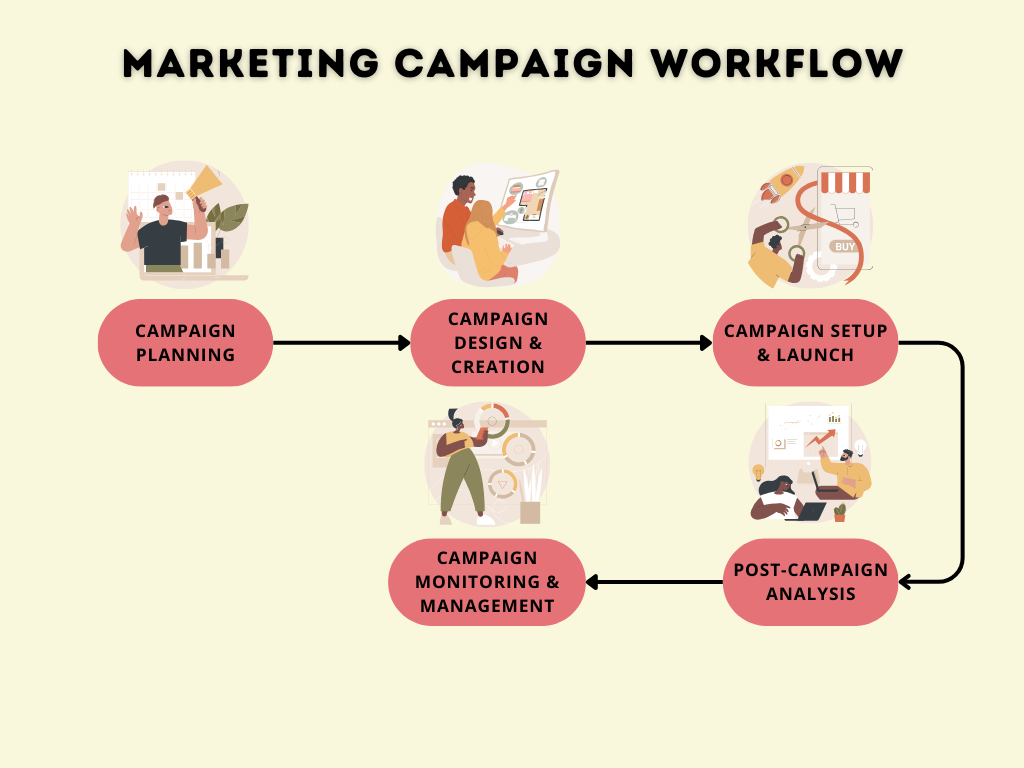
Campaign Planning
- Set Campaign Goal: Identify what you want the campaign to achieve (e.g. increase brand awareness, generate leads, drive sales)
- Identify Target Audience: Determine who you are trying to reach, their characteristics, preferences, and how they can be reached
- Develop Campaign Strategy: Decide on the marketing channels to use, the content to generate, and promotional strategies to implement
Campaign Design and Creation
- Content Creation: Develop compelling content that speaks to your target audience and resonates with their needs or wants
- Visual Design: Create visuals that reflect your brand, grab attention, and communicate key marketing messages
- Landing Page Development: Craft a conversion-focused landing page where you can collect visitor information or showcase your product/service
Campaign Setup and Launch
Campaign Setup
- Implement promotional strategies across chosen marketing channels
- Upload content, schedule posts, set up email automation, etc.
SEO & Campaign Optimization
- Ensure all content is optimized for SEO
- Track metrics and optimize campaign elements for higher conversion
Campaign Launch
- Officially launch your campaign and start attracting traffic
Campaign Monitoring and Management
Tracking & Analytics
- Monitor your campaign's performance by measuring metrics related to your campaign goals
- Use tracking tools to analyze user behavior, channel performance, bounce rates, etc.
Performance Review
- Regularly review your campaign’s performance and adjust your tactics as necessary
Post-Campaign Analysis
Campaign Report
- Compile a comprehensive report detailing the success and challenges of your campaign
- The report should cover metrics, targets achieved, ROI, lessons learned
Campaign Optimization
- Use insights from the campaign report to optimize future campaigns
Retail Inventory Management Workflow Template
A well-planned inventory management workflow can reduce overhead costs and increase customer satisfaction in retail businesses.
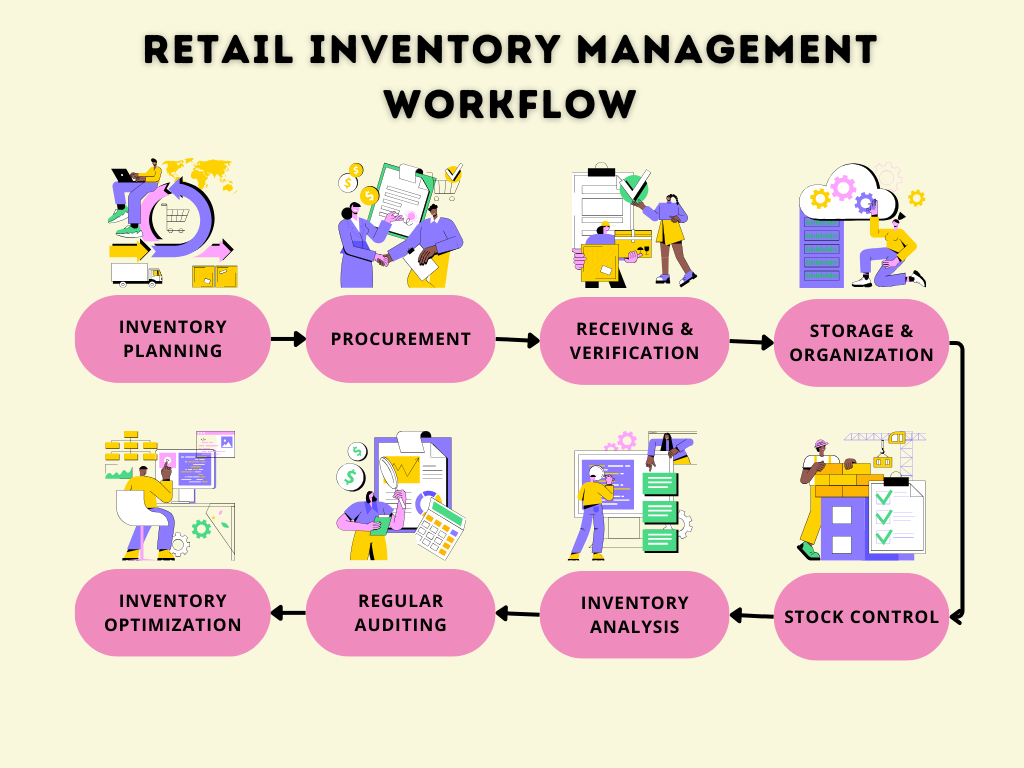
Inventory Planning
- Forecast Demand: Use past sales data, industry trends, seasonal tendencies, and economic indicators to estimate the quantity of each product you'll sell in a given period.
- Determine Stock Levels: Calculate the Minimum Stock Level, Maximum Stock Level, Reorder Level, and Safety Stock for each product.
Procurement
- Select Vendors: Shortlist potential vendors based on criteria such as price, quality, reliability, and terms of service.
- Place Purchase Orders: Issue purchase orders to chosen vendors specifying product details, quantities, delivery date, and terms of payment.
Receiving and Verification
- Receive Shipment: Check the quantity and condition of received goods.
- Verify Delivery: Compare the received shipment against the purchase order.
- Handle Discrepancies: If a discrepancy is found, communicate with the vendor to resolve the situation.
Storage and Organization
- Store Inventory: Store the received shipment in an organized, secure location.
- Update Inventory Records: Update your inventory management system with new stock levels.
Stock Control
- Monitor Sales: Regularly monitor sales data to keep track of product performance.
- Reorder Inventory: When stock levels hit the Reorder Level, place new orders with vendors.
Inventory Analysis
- Monitor Stock Levels: Regularly review stock levels to ensure you're holding the right amount of each product.
- Analyze Inventory Turnover: Calculate inventory turnover ratio to measure how often you sell and replace stocks within a certain period.
- Perform ABC Analysis: Categorize inventory items into A, B, and C groups based on their impact on overall inventory cost.
Regular Auditing
- Conduct Physical Counts: Perform regular physical counts of inventory to check accuracy.
- Investigate Discrepancies: If discrepancies are found between physical counts and inventory records, investigate and resolve the issue.
Inventory Optimization
- Evaluate Vendor Performance: Evaluate vendor reliability, quality of products, adherence to delivery schedule, and terms of service.
- Eliminate Excess Stock: Manage and eliminate excess stock to minimize holding costs.
Manufacturing Production Workflow Template
Understanding and managing your manufacturing production workflow is crucial to ensuring efficiency, reducing waste, and maximizing profitability.
Here's a step-by-step template to streamline your manufacturing process:
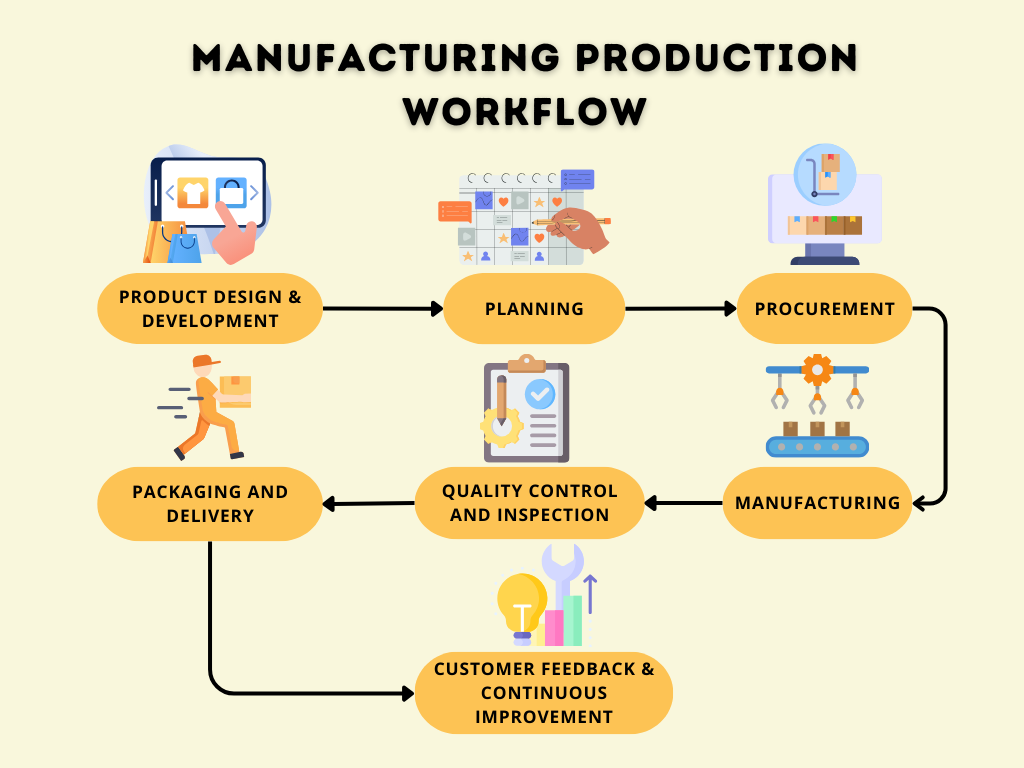
Product Design & Development
- Concept Development: Develop a new product idea or improve an existing one.
- Design & Prototyping: Design product based on specified criteria, build prototype if necessary.
- Product Testing: Run tests on the prototype to ensure it meets quality standards and intended functions.
Planning
- Materials Planning: Identify necessary materials, tools, and equipment to produce the product.
- Production Capacity Planning: Develop a realistic production schedule considering available resources, demand forecast, and lead times.
- Quality Assurance Planning: Create quality standards and inspection procedures for the production process.
Procurement
- Materials Procurement: Define specifications for materials, identify suppliers, and make orders.
- Inventory Management: Track and control inventory of raw materials, work-in-progress, and finished goods.
Manufacturing
- Production Execution: Start the actual manufacturing process as per the defined sequence of tasks.
- Ongoing Quality Checks: Conduct quality checks throughout the process to ensure standards are maintained.
Quality Control and Inspection
- Final Quality Inspection: Conduct a thorough quality inspection of finished goods before they are packaged.
- Product Adjustments: Make any necessary adjustments or modifications to ensure the product meets the desired quality.
Packaging and Delivery
- Packaging: Securely package the product for delivery or storage.
- Delivery Preparations: Organize shipping and logistics for product delivery to wholesalers, retailers, or direct customers.
Customer Feedback and Continuous Improvement
- Collect Feedback: Gather customer feedback regarding product and its quality.
- Continuous Improvement: Use customer feedback, and operational data to continually improve the manufacturing process.
This manufacturing workflow template is just a basic guide and may require modifications and adaptations based on specific industry needs, organization size, product complexity, and customer requirements.
Conclusion
Workflow templates are invaluable tools across various industries.
They streamline processes, enhance efficiency, and ensure consistency.
By implementing workflow templates, businesses can optimize their operations, reduce errors, and deliver better results.
Customizing these templates to fit your organization's unique needs is the key to success.
So, start simplifying your work processes today with workflow templates tailored to your industry.
